
 Custom Button Examples (Continued)
| Image Conversion | ||||||||||||||||||
|---|---|---|---|---|---|---|---|---|---|---|---|---|---|---|---|---|---|---|
|
Directory Opus has a simple built-in image conversion command which can be used to convert images between several popular formats, as well as perform resizing and rotation. If no arguments are provided then you're given a conversion dialog as already seen in the Big Features section. If you're performing the same conversion frequently then you're going to get sick of clicking all over a dialog. Fear not, because you can create buttons which automate your common image conversion tasks. For example, this will create 128x128 JPEG thumbnails of all the selected images:
While the internal conversion functionality can only write to JPG, GIF, BMP and PNG files, it can read from any format that you have a plugin for. You can, for example, use Opus to batch-convert your raw digital camera photos into high quality JPEGs without any external software. If you need to go beyond the internal functionality you always have the option of using Opus to run external programs such as ImageMagick. | ||||||||||||||||||
| Share Images | ||||||||||||||||||
|
You can mix internal and external commands. In this case, I want to copy the selected file to my website via FTP and then put its URL into the clipboard so I can paste it to someone:
The first line runs the internal Copy command to send the file to an FTP site. Once the copy completes the external SetClip.exe command is run. SetClip puts whatever arguments you give it into the clipboard. In this case we give SetClip the appropriate URL and Opus will substitute the name of the file that was selected in place of {file$}. Since SetClip is a command-line program, the runmode hide line is needed to stop an ugly command-prompt window from appearing briefly while SetClip runs. | ||||||||||||||||||
| Diffing Tools | ||||||||||||||||||
|
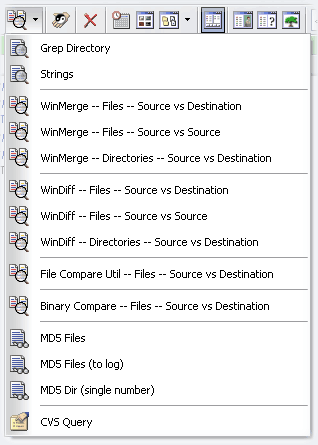
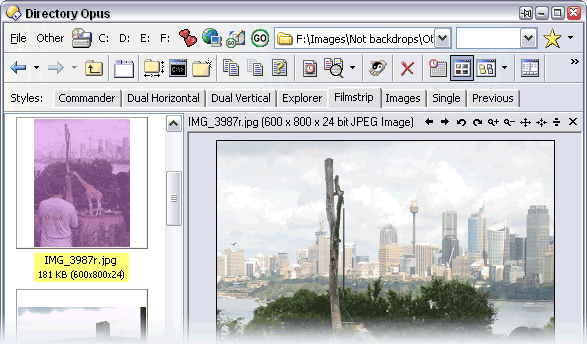
If you work on software as part of a big team then you'll often need to see what's changed between two versions of a project using a tool like WinMerge or WinDiff. Sometimes you'll want to compare two files in different directories, sometimes two in the same directory, and sometimes you'll want to compare two complete directories. Being able to do all of these directly from your file manager really speeds things up. I've used a button-menu for this: Clicking the main button performs the most common action, comparing the two files selected in the Source and Destination windows:
Clicking the arrow next to the button opens up a menu:
The first item uses XP's built-in findstr command to "grep" for strings in the current directory. The {dlgstring} part causes Opus to open a dialog asking what I want to search for. The pause command keeps the command-prompt from closing automatically. Unlike the other commands, this one needs its type set to MS-DOS Batch Function, so that the pause command works.
This is the command which compares the first two selected files in the current directory. (It really passes all selected files to WinMerge, so it's up to me to remember to only select two.)
Below is the command to compare the source and destination directories using WinMerge. The noterm part stops Opus from adding a trailing backslash to the paths, since this confuses WinMerge.
The WinDiff, File Compare Util and Binary Compare functions are all variations on the same theme. Sometimes one program is more useful than others, so I keep them all to hand. The MD5 and CVS buttons run simple batch files and aren't that interesting. For programmers it's worth mentioning that Opus is compatibile with the Tortoise GUIs for CVS and Subversion source control, including the overlay icons and the extra columns they add for file versions and so on. | ||||||||||||||||||
| Save Mouse-clicks | ||||||||||||||||||
|
Opus provides many unique tools but you'll often find the biggest difference it makes it that lets you do things you could already do, only more efficiently. This next three-button is all about that. The left-click action simply takes me to my Desktop folder which I use frequently to manage downloads and documents that I'm working on. Going to the Desktop folder is nothing new -- you've always been able to do it -- but in Opus you can create a toolbar button, or a hotkey, to do it immediately in a single click or key press.
The /Desk path is an Opus Folder Alias which I've created myself. There is a built-in alias called /Desktop which takes you to the Desktop virtual folder, but I don't want that. The virtual folder is a view of your personal Desktop merged with the All Users Desktop folder and then topped with a sprinkling of icons, like My Computer and Recycle Bin, which don't physically exist anywhere. I don't want to see all that extra stuff, so I use my /Desk alias which points directly at my Desktop folder. I could have set the button to use a full path instead of a folder alias:
I didn't use the full path because I also use /Desk in a few other places and I copy my Opus configuration between three computers, each of which uses a different account name and thus a different Desktop path. By using an alias I only have to edit one thing when I copy my config to another machine. While on the subject, the Go command's USER argument is another way to go to profile directories for yourself or any other user (assuming you have permission):
Let's go back to the three-button I was describing. Its other two functions are unrelated to the first but I've put them together to save space. The button's right-click action runs this:
/NewImages is another folder alias which points to E:\Images\New. I save a lot of pictures from the internet, particularly ones involving cats, and the files first end up on my Desktop along with the rest of the day's junk. Once the Desktop becomes cluttered I go through the pictures working out which ones I really want. Despite my mental condition I don't quite keep every single cat picture I find. If I don't want an image I click the delete button and if I do want it I click this button to move it into my images folder, out of the way. All this happens without having to open another window and in particular without having to view the destination folder. The middle-click action is:
Another Go button, this time to go to my new images directory. Opus is set to switch to thumbnail view and sort by date when this directory is shown, making it really easy to find my latest cat photo. | ||||||||||||||||||
| Filter and Toolbars | ||||||||||||||||||
|
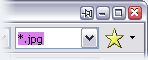
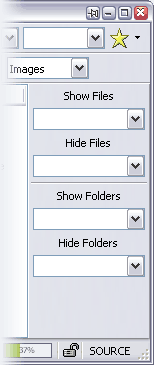
Let's finish off this section by focusing on the two items in the top-right of my Opus windows. The first is a Show Files filter box which was demonstrated back in the Big Features section. To recap, if I type *.jpg into there then the window will only show me .jpg files.
I've bound the
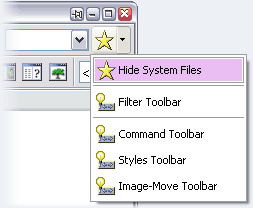
The main button part of the button-menu, the star icon, simply clears the filter so that all files are showing:
Erasing the text in the filter box has the same effect. Clicking the arrow part pops open a menu in which I've placed commands related to filtering and extra toolbars:
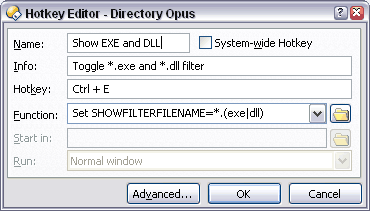
The first item toggles display of hidden system files:
Most of the time I don't want hidden system files cluttering up my view, particulary in the root directories, but when I need to work on such a file this menu item saves me a trip to the Preferences dialog. The next item toggles my Filter toolbar (which I can also do via its hotkey, Mnowrap>ctrl-f):
I made this toolbar to contain the four filter boxes for showing and hiding files and directories using wildcards. It includes another copy of the Show Files box along with its three lesser-used friends.
The Command Toolbar item toggles a simple toolbar which I made to contain just the Command edit box. This box allows you to enter a single-line Opus command and execute it on the active window. It's useful for testing commands and for running one-off actions when it isn't worth creating a button.
The Styles Toolbar item toggles the Styles toolbar, which comes with Opus. By default this is just a tab control that allows you to switch lister styles, which are like saved presets for viewing directories in different ways.
Although other people are big fans of it, I don't actually use the styles system in Opus as I'm used to changing the view via other methods. I still keep a shortcut to the Styles toolbar just in case I get the urge to mess around with it. Remember, Opus is a vast toolbox and if you explore it then over time you'll find the the parts which suit you best. There's too much to learn everything at once so don't even try to. The best way is to use the defaults and then, every time you need something new or don't really like the way something works, change it. Let your configuration evolve and always ask yourself if there's a better way to do what you're doing now. Don't let me or anyone else tell you how to do things when there may be a way that's more intuitive to you. Equally, don't be put off something just because you're used to working in another way because sometimes, when you give it a chance, you'll find the alternative is better. The very last item toggles my Image-Move toolbar. This is one that I made which contains a whole load of buttons, each of which moves the selected items to a different folder. Eventually the new images directory I was talking about contains several thousand files and it's time to organise them. This lets me do it quickly, without opening a separate window for every possible destination.
|

That's it for button examples. Continue to the next page to learn about the little things that mean a lot.